Custom email template in QuickBooks allows users to personalize their emails before delivering emails to customers and vendors. You can customize email templates in QuickBooks online with tailored subject lines and email bodies, save them in the Company Preferences tab and pick the one while sending invoices, sales receipts, estimates, and other transactions. It also makes you avoid spending time on unnecessary stuff thus saving your time.
Sometimes, the users may come across a challenge when emails use the old template instead of the customized one. Indeed such an issue needs to be immediately addressed. Don’t worry! If you have been stuck in such a situation and want to come out immediately, then this blog post will help. After reading it and following the instructions you can fix as well as create a custom email template in QuickBooks online without any hassle.
Let’s begin with creating customized email templates…
How to Create Custom Email Template in QuickBooks?
Step 1: Template – Create, customize and set as default
- Launch QuickBooks and sign in as an administrator. Alternatively, you may sign in as a user but you should have permission to edit the company preferences.
- Once logged in, you can click the File tab and click Switch to Single-User Mode.
ALSO SEE:- How To Resolve Overflow Errors In QuickBooks Desktop?
Create a template (use these instructions for each template)
- Click the Edit tab, and choose Preferences.
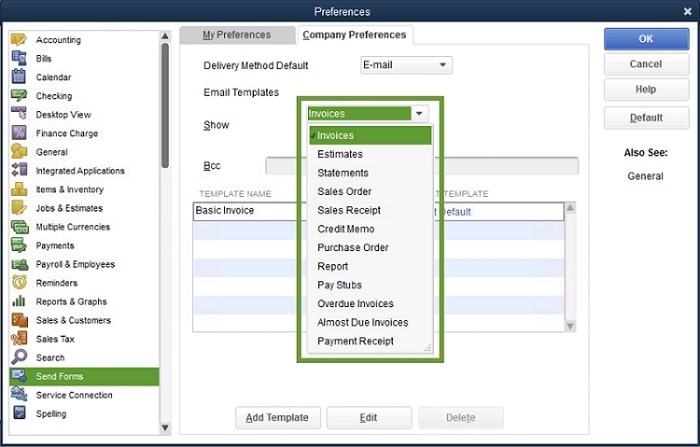
- On the next screen, click Send Forms and then hit the Company Preferences
- Click Email under the Delivery Method Default drop-down section.
- Click Transaction Type under the Email Templates drop-down menu. Similarly, you can create multiple customized email templates for each transaction type (invoices, estimates, statements, sales orders, etc.)

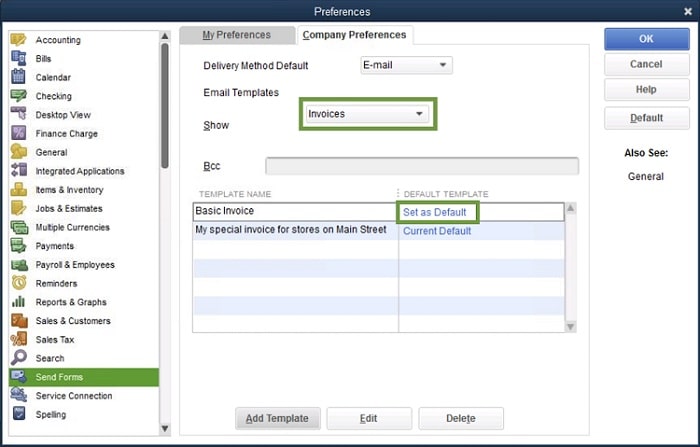
- Move your cursor to the bottom and click Add Template, add a name for the newly created template.
- Now you should write the subject line and body.
- You can insert the dynamic data field in your email by selecting the Insert Field.
- Put the customer name, due date, and other information in the online form, click Save once done.
- Go to the Company Preferences tab and click Ok.
Set the custom email template as the default
- Open the Send Form.
- Go to the Company Preferences.
- Select the transaction type, and click Set Default against the template you want to use.

Step 2. Use the preferred template
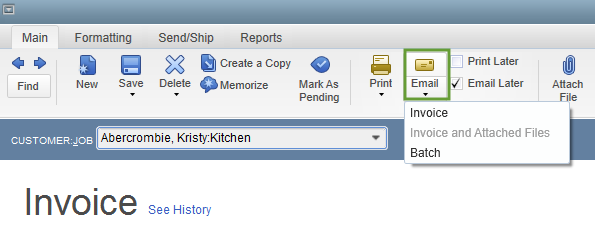
Once you are done with creating the customized email template, you can use the preferred one while sending an email like single transactions, batch emails, or send the pay stubs. All you need to do is choose Email from the menu bar and click Invoice from the drop-down list. Now QuickBooks will automatically pick the default template for a particular transaction type.

However, if you go for Email Later option, then you will need to manually select the template. Simply go to File menu, click Send Forms, and choose the appropriate template from the Template drop-down menu.
In a few circumstances, you might experience that the emails are not using the new templates. In that case, you should attempt the below instructions on how to fix the custom email template issue in QuickBooks.
YOU MAY ALSO LIKE:- How to Fix QuickBooks Subscription has Lapsed Error?
Steps to fix custom email template issues in QuickBooks online
Follow the below instructions to resolve the customized email template error.
Method 1: Before sending an email, copy and paste the correct message in the body section
- In QuickBooks, click Edit and then click Preferences.
- Choose the option Send Forms.
- Click Company Preferences.
- Select the preferred template and click Edit.
- Copy the message body that you want to send.
- Go to the File menu and click Send Forms.
- Now choose the email that you want to deliver, paste the message in the body section. However, for the QuickBooks desktop enterprise version, Edit Mail should be chosen before sending an email.
- Hit the button Send Now.
- Try the next method if it didn’t work out.
Method 2: Reset the Email Later settings
- Begin with locating the transactions that need to be sent.
- Now uncheck the Email Later box and click Save & Close.
- Further, you have to reopen the transaction, and checkmark the Email Later
- Click Save & Close.
- After following these tips you should be able to fix the default custom template problem.
Need assistance on creating and fixing a custom email template? Call for help
Yay! We are glad to assist you in fixing the custom email template error. In case, you can’t understand the steps or are unable to reach the desired conclusion then you should drop up a call on QuickBooks Customer Support and talk to our certified QuickBooks pro advisors. We have made our services available 24/7 to assist you. Hurry up! Call us today and get help.